Tiles installation is one of the most important stages in achieving durable, visually appealing, and long-lasting flooring or wall surfaces. Whether it is for a home, office, bathroom, kitchen, or outdoor area, proper tiles installation determines not only the aesthetic outcome but also the structural integrity and maintenance needs of the surface. Professional techniques ensure that tiles remain level, aligned, and resistant to cracking or water damage over time.
Understanding the fundamentals of tiles installation helps homeowners and builders avoid costly mistakes and achieve high-quality finishes that stand the test of time.
Understanding Surface Preparation for Tiles Installation
Before any tiles installation begins, surface preparation is essential. A poorly prepared base is the most common cause of tile failure, including uneven surfaces, loose tiles, or premature cracking.
Professionals start by ensuring the surface is clean, dry, and free from dust, grease, or old adhesive. If the surface is concrete, it must be fully cured and leveled. Any uneven areas are corrected using a leveling compound to create a smooth base. In wall applications, especially in bathrooms or kitchens, waterproofing membranes are often applied to prevent moisture penetration.
Accurate surface preparation directly impacts the success of tiles installation. Without it, even high-quality tiles and adhesives will not perform well over time.
Choosing the Right Materials for Tiles Installation
Material selection plays a major role in successful tiles installation. Tiles come in various types such as ceramic, porcelain, marble, granite, and mosaic. Each type has unique properties that influence where and how it should be installed.
Porcelain tiles, for example, are highly durable and suitable for both indoor and outdoor flooring due to their low water absorption. Ceramic tiles are commonly used for walls because they are lighter and easier to handle. Natural stone tiles require sealing to protect against stains and moisture.
Equally important is choosing the correct adhesive. Cement-based adhesives are commonly used for floor tiles, while specialized adhesives may be required for heavy or large-format tiles. Grout selection also matters, as it fills the gaps between tiles and prevents water infiltration.
Professional tiles installation always involves matching the right tile type with the appropriate adhesive and grout to ensure long-term performance.
Layout Planning and Precision in Tiles Installation
One of the most overlooked but critical steps in tiles installation is layout planning. A well-planned layout ensures symmetry, balance, and minimal waste of materials.
Professionals begin by measuring the space accurately and marking reference lines. These lines act as guides to ensure tiles are laid straight and evenly spaced. Dry laying tiles before fixing them helps visualize the final outcome and allows adjustments before permanent installation begins.
In tiles installation, starting from the center of the room or a focal point often produces the most balanced appearance. This prevents awkwardly cut tiles from appearing in visible areas. Proper spacing between tiles is maintained using tile spacers, ensuring consistent grout lines.
Precision during layout planning significantly enhances the final appearance and quality of tiles installation.
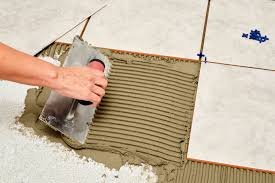
Professional Application Techniques in Tiles Installation
The actual process of tiles installation requires skill and attention to detail. Adhesive is applied evenly using a notched trowel to ensure proper bonding. Tiles are then pressed firmly into place with slight twisting motion to eliminate air pockets underneath.
One key professional technique in tiles installation is back-buttering, where adhesive is also applied to the back of large or heavy tiles. This ensures maximum adhesion and reduces the risk of hollow spaces that can cause cracks later.
Leveling systems are often used in modern tiles installation to prevent lippage, which occurs when tile edges are not perfectly aligned. These systems help maintain a flat, even surface across large areas.
Cutting tiles accurately is another essential skill. Professionals use tile cutters or wet saws to achieve clean edges, especially around corners, outlets, and edges.
Grouting and Finishing in Tiles Installation
Once tiles installation is complete and the adhesive has fully set, grouting begins. Grout is applied between tiles to fill gaps and lock the tiles in place. It also plays a vital role in preventing moisture from seeping underneath the tiles.
There are different types of grout, including sanded and unsanded varieties. Sanded grout is used for wider joints, while unsanded grout is suitable for narrow spaces. Choosing the correct grout ensures durability and a smooth finish.
During tiles installation finishing work, excess grout is cleaned off the tile surface before it hardens. After curing, the surface is polished to remove haze and enhance shine. In some cases, sealants are applied to protect grout lines from stains and moisture damage.
Proper finishing is what transforms basic tiles installation into a professional-quality surface.
Common Mistakes to Avoid in Tiles Installation
Even small errors in tiles installation can lead to long-term problems. One common mistake is skipping surface leveling, which results in uneven tiles. Another is using incorrect adhesive, leading to weak bonding and tile detachment.
Improper spacing is also a frequent issue. Without consistent gaps, grout lines appear uneven, reducing the visual appeal of the installation. Additionally, rushing the drying process can compromise the strength of the adhesive bond.
Professional tiles installation avoids these mistakes through careful planning, proper tools, and adherence to industry standards.
Maintenance Tips After Tiles Installation
After completing tiles installation, proper maintenance ensures longevity and appearance retention. Regular cleaning with mild detergents helps prevent dirt buildup. Harsh chemicals should be avoided as they can damage grout and tile surfaces.
For high-moisture areas like bathrooms, proper ventilation is important to prevent mold growth. Periodic resealing of grout lines in natural stone or porous tiles helps maintain water resistance.
With proper care, a high-quality tiles installation can last for decades without losing its original appeal.
Conclusion
Tiles installation is a detailed process that combines preparation, precision, and professional techniques to achieve flawless flooring and wall finishes. From surface preparation and material selection to layout planning, installation, and finishing, every step plays a crucial role in the final outcome.
When done correctly, tiles installation not only enhances the beauty of a space but also ensures durability and long-term performance. Whether for residential or commercial projects, investing in professional techniques for tiles installation guarantees a perfect balance of strength, style, and sustainability.